kitchen

Making Indian Food At Home

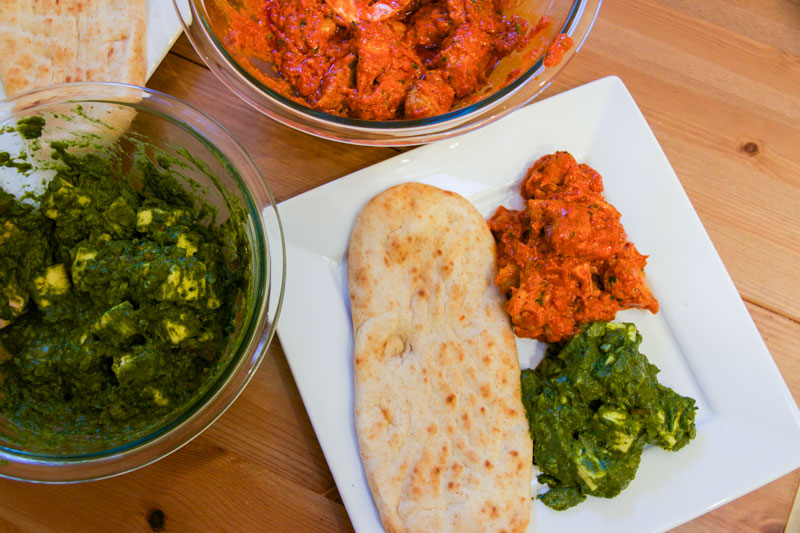
Back in April, Andrew and I attempted to make Indian food for the first time… and it turned out awesome! Much better than we expected, haha.

Andrew made Chicken Tikka Masala and I made Palak Paneer. Interesting fact I learned along the way: the difference between palak vs. saag paneer are the greens that are used. “Saag” can be cooked with multiple types of greens, while “palak” is only puréed spinach.

We were nervous how the curries would come out because most of the recipes online seemed… inauthentic? But the most difficult thing about Indian food is that there really are no “true” recipes. When I ask any of my Indian friends how they cook Indian food, it’s always “Oh, a little bit of this spice, add a little bit of that. My mom never wrote it down… Just grab a whole bunch of stuff, throw it together, and usually it’s awesome.”

Thanks Indian friends, that’s really helpful for those of us who did not grow up cooking or eating Indian food.

As I was following the online recipe for palak paneer, I realized what my friends meant. Sometimes, you just had to go off-recipe by adding more cream because the texture did not turn out creamy enough or the spinach needed more spices because the purée was bland. I suppose there’s just so many regional differences or taste preferences that it makes it hard to write down an exact recipe to follow. Just like everyday cooking, I had to make it my own.

The thought of making Indian at home is intimidating for many of us when you can buy a jar of pre-made curry from your local Whole Foods or frozen palak paneer from Trader Joe’s (which is SO yummy), but if you’re feeling adventurous, it’s definitely one of the more challenging (and fun!) cuisines to make at home. Definitely have a lot of respect for Indian chefs who know these recipes inside and out.

Oh, your clothes might smell like Indian food for a while, haha.

Fava Beans: The Neglected Legume

When I stand in the aisle of the grocery store looking for canned beans, I always see the usual suspects: kidney beans, red beans, pinto beans, black beans, navy beans, and garbanzo beans. Based on a study by the Can Manufacturers Institute, Americans consume more than five cans of fruits and vegetables in an average week, so naturally, these legumes are always top of mind in the legume consideration set.

Let me preface this post by saying: I love all legumes and do not discriminate. Canned garbanzo beans have saved me on many quick-meal nights (great add for vegetable curries), and I will never refuse a bowl of Boston baked beans. Unfortunately, I feel that there are a lot of foods, though they may be foreign or do not come in a can, that deserve to be in an American consumer’s consideration set… like the fava bean!

Also known as “broad beans,” these legumes are popular in Mediterranean and South American cuisines and are high in plant protein like other legumes. They are also full of nutrients including vitamin B, iron, and manganese. Interestingly, these little beans also contain L-dopa, which is a pre-cursor amino acid in producing dopamine in your brain, making you feel happy!

As with anything beneficial or rewarding, there is always some work involved. These little nuggets take some time to prepare because I have never seen them in a can, but I could be wrong. Fava beans come in long green pods and need to be shelled twice to get to the good stuff.

How To Pick Fava Beans

Only the beans inside the long pods are edible, so it’s unfortunate that these beans are purchased by the pound and most of the pod gets discarded (we do live in a capitalist country…). Pick green pods that are full, firm, and bright green. This indicates that the beans inside are ripe and full.

How to Prepare Fava Beans

As I mentioned before, fava beans require two shellings. Open the outer green pod and set the beans aside.

  • I find that the easiest way to open the whole pod in one fell swoop is by pinching the top stem and pulling the seam down the middle of the pod. Or if you’re not always about perfection, efficiency, or want to get messy (this is a great kid’s activity), I also like to stick my fingers through the spongy pod and pop them out one-by-one.

The light green shells (the ectoderm) also need to be removed. Steam or blanche the beans, and once they are cool enough to be touched, remove the light green outer shell as shown below.

If the beans are not tender yet, you can cook them a little longer, steam, blanche, incorporate into a dish… but there you have it, your fava beans are ready to be eaten!

How To Use Fava Beans

What I love most about fava beans is their creaminess. Mash them up, add some tahini, olive oil, garlic, and lemon, and you’ve made yourself some delicious fava bean hummus. Add them to a stir fry, salad, or pasta and it will give your dish an added layer of texture.

My favorite way to cook fava beans is with a little bit of bacon or pancetta. Because of the fava beans’ creamy texture, I like to pair it with a little bit of crunch, and crispy pork does just that. On that particular day, I used the fava beans and bacon in a curried couscous appetizer, which incorporated texture and flavor to create a well-rounded and dynamic dish. My guests thoroughly enjoyed it and thought it was the best dish of the night!

The average diner may run into the fava bean once in a while at a high-end restaurant from a tasting menu, but that is not enough exposure to bring the bean mainstream and in to kitchens. Fava beans are so delicious and deserve to be in the spotlight more often, especially since they’re so nutritious! I encourage you to take the time to explore your local grocery store and buy something you haven’t seen before (maybe even some fava beans!). With the internet, you can learn almost everything and anything about an ingredient.

I wholeheartedly hope that one day, the fava bean will gain enough fame to rival the pinto bean and have a place on the bean aisle. Until then, I will continue to be its ambassador and cook them more often in my kitchen!

Are there ingredients you wished more consumers knew about or enjoyed?

Cooking My Way Back To Manila

I love traveling. It’s an opportunity to experience the local culture, and of course, the local food. Since returning from Manila, I have really missed Filipino food… That’s the one sad thing about traveling — you have to leave the food behind. And in an area like Boston, there aren’t too many places with authentic ethnic food.

But now we live in the age of the internet where you can find authentic recipes after a Google search and a few clicks! If Filipino food couldn’t come to me, I was going to MAKE IT come to me.

My friend, Andrew, and I decided we were going to cook different cuisines together once a month, and our Filipino dinner was the first. He decided to make Chicken Adobo and I made one of my favorite vegetable dishes, Ginataang Gulay. “Adobo” is a Filipino-style marinade, which consists of vinegar and soy sauce. It’s a popular cooking process used with other meats such as pork and seafood. Some consider Adobo as the unofficial dish of the Philippines. “Ginataang” also refers to a preparation method, which means to cook in coconut milk. Since “gulay” is vegetables in Tagalog, the Ginataang Gulay dish was literally mixed vegetables stewed in coconut milk.

I’m not going to endorse or recommend any of the recipes we used because we had to alter and combine bits and pieces from multiple recipes to make it work. With that said, the dishes turned out delicious and were pretty close to the authentic stuff I had in Manila. Sure, it may not have been the real thing, but that’s the beauty of food — it brings back the old like good memories, and infuses the new to make it your own.

If you know any good Filipino restaurants in the Boston area, please let me know. But until then, I will continue practicing my Pinoy cooking skills and one day impress my Filipino friends.

How do you like your crepes?

I love making breakfast because it’s such a versatile meal: banana pancakes, omelets, steak and eggs - it really can be eaten at any time of day!

One of my favorite breakfast go-tos is crepes. These thin pancakes allow even more versatility because they can be served sweet or savory, which is especially helpful when you have a handful of random ingredients in the fridge…

For a quick, delicious, and simple crepe recipe, I just use the Basic Crepes Recipe from Allrecipes.com. You can find it here. Super easy to prepare and has a neutral flavor, so you can make both sweet and savory crepes in the same meal.

My favorite part of making crepes is figuring out what to put in them. Of course there’s the typical combinations…

  • Nutella/peanut butter/jam and [fruit] for a sweet crepe
  • Eggs/[Meat], Vegetables, and [cheese] for a savory crepe

But if you start thinking out of the box… there are so many other ingredients that can brighten those basic recipes! Here are some suggestions:

  • Fresh herbs - love using fresh mint, basil, and lavender
  • Puréed ingredients like sweet potato or garlic spread
  • Honey, goat cheese/greek yogurt (yum…)

Jonathan suggested Doritos… to each their own I guess, haha.

Do you have any suggested combinations to try? What are your favorite crepe fillings?